HOW TO INSTALL ORACLE BINARIES AND ORACLE DATABASE FOR 11gr2 IN SOLARIS 11.X, AND PREVIOUS PREPARATION FOR THE OS ENVIRONMENT
Preparing the Solaris 11.3 OS for database installation
1.-Create Zpool and ZFS Files system
Create Zpool
#zpool create data c5t025340000233000865d0
Create ZFS Files System
#zfs create data/oracle-bin (For Install BINARIES)
#zfs create data/u01 (For Install DATABASE)
#zfs create data/arch (For REDOLOG)
#zfs create data/backup (and RMAN BACKUP)
2.-In this case we are installing a OLTP Database, we will set the File System Recordsize to 8k, as zfs recommend
#zfs set recordsize=8k data/oracle-bin
#zfs set recordsize=8k data/u01
#zfs set recordsize=8k data/arch
3.-Mount ZFS files system in the respective mount point
#zfs set mountpoint=/oraclebin data/oracle-bin
#zfs set mountpoint=/u01 data/u01
#zfs set mountpoint=/arch data/arch
#zfs set mountpoint=/backup data/backup
Now we have mounted the files system
4.-Create user and group for the database
#groupadd -g 1000 dba
#useradd -u 100 -g 1000 -m -d /oraclebin/oracle -s /bin/bash oracle
80 blocks
5.-Generate a project for the user oracle that will be used to manage the database
I have a previous template I will edit the /etc/project file and copy and paste the info below
#vi /etc/project
system:0::::
user.root:1::::
noproject:2::::
default:3::::
group.staff:10::::
group.oracle:200:Oracle Default:oracle::process.max-sem-nsems=(privileged,256,deny);project.max-sem-ids=(priv,100,deny);project.max-shm-ids=(privileged,256,deny);project.max-shm-memory=(privileged,1073741824,deny)
6.-Validate the project created
#projects -l
group.oracle
projid : 200
comment: "Oracle Default"
users : oracle
groups : (none)
attribs: process.max-sem-nsems=(privileged,256,deny)
project.max-sem-ids=(priv,100,deny)
project.max-shm-ids=(privileged,256,deny)
project.max-shm-memory=(privileged,1073741824,deny)
The project.max-shm-memory is the maximum quantity of memory that project can be use
7.-When you created the user in the step 4, the user oracle was created belonging to Default Project, now you need to change this and assign the user to group.oracle Project
$id -p
uid=100(oracle) gid=1000(dba) projid=3(Default)
Add the user to the "group.oracle" project as root you need to use the usermod command as below
# usermod -K project=group.oracle oracle
Login to oracle and with the id command you can check that you belong to the "group.oracle"
# su - oracle
Oracle Corporation SunOS 5.11 11.3 October 2015oracle@~$ id -p
uid=100(oracle) gid=1000(dba) projid=200(group.oracle)
8.-Set the correct permission for the files system created "oracle user" and "dba group"
#df -h | egrep "oraclebin|u01|arch|backup"
data/oracle-bin
488G 32K 394G 1% /oraclebin
data/u01 488G 31K 394G 1% /u01
data/arch 488G 31K 394G 1% /arch
data/backup 488G 31K 394G 1% /backup
data/oracle-bin/oracle
488G 35K 394G 1% /oraclebin/Oracle
# chown oracle:dba /oraclebin /u01 /arch /backup /oraclebin/Oracle
9.- Verify that you have installed the following packages, if you do not have them installed perform as root user the following command (You will need to have access to internet)
#pkg install top xterm xclock motif xauth x11-info-clients library/motif libxp make developer/assembler
Aditionally install the compatibility with ucb command (Berkley Software Distribution)
#pkg install compatibility/ucb
10.-Upload to the server the installation packages and uncompress them (we uploaded them to /oraclebin)
solaris.sparc64_11gR2_database_1of2.zip
solaris.sparc64_11gR2_database_2of2.zip
#unzip solaris.sparc64_11gR2_database_1of2.zip
#unzip solaris.sparc64_11gR2_database_2of2.zip
11.-We will use the MOBATERM for installation process that help with Export Display
You can download it from the following page:
http://mobaxterm.mobatek.net/download.HTML
or you can export the display as below
#export DISPLAY=<REMOTEIPADDRESS>:10.0
12.-Go to oraclebin/database directory and execute "runInstaller" as Oracle
:/oraclebin/database$ ls -ltr
total 46
-rw-rw-rw- 1 oracle dba 5399 Nov 4 2009 welcome.html
-rwxr-xr-x 1 oracle dba 6513 Nov 6 2009 runInstaller
drwxr-xr-x 14 oracle dba 30 Nov 6 2009 stage
drwxr-xr-x 2 oracle dba 3 Nov 6 2009 sshsetup
drwxr-xr-x 2 oracle dba 2 Nov 6 2009 rpm
drwxr-xr-x 2 oracle dba 5 Nov 6 2009 response
drwxr-xr-x 4 oracle dba 14 Nov 6 2009 install
drwxrwxrwx 11 oracle dba 13 Nov 6 2009 doc
/oraclebin/database$ ./runInstaller
Starting Oracle Universal Installer...
Starting Oracle Universal Installer...
Checking Temp space: must be greater than 180 MB. Actual 37716 MB Passed
Checking swap space: must be greater than 150 MB. Actual 39903 MB Passed
Checking monitor: must be configured to display at least 256 colors. Actual 16777216 Passed
Preparing to launch Oracle Universal Installer from /tmp/OraInstall2016-06-03_10-12-08AM. Please wait ...


uncheck the checkbox "I wish to receive security updates via My Oracle Support".

Click Next
 Ignore this messages and click "YES"

We will only install the Oracle binary, select the second option "Install database Software Only" then click NEXT
 We will install the binaries for single instance then click NEXT
 Click Next
 Choose the Enterprise Edition Option and them click on NEXT

We did choose the Oracle Base and the Oracle Home as showed above and click Next

We Selected as Database Administrator and Operator the DBA Group, then click NEXT


 Click Next
 Select Create DataBase and Click Next
 Select the fist options (For transaction Database)
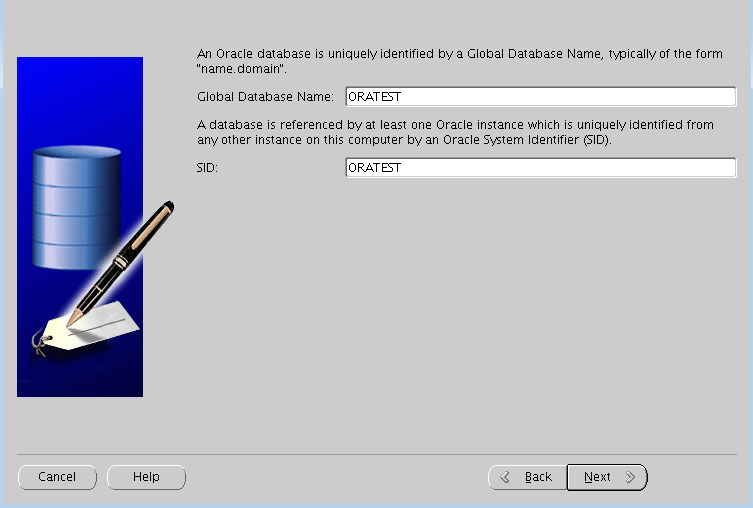
 Set Global DataBase and SID
 Uncheck Enterprise Manager
 In our case we specify the same password for system and sys, because we are doing a testing, however you can set a different password for user


Specify the Flash Recovery Area and If you will have the DataBase in Archive Mode
 You can specify if you need to add the Sample Schemas or Not
 Set the SGA and PGA Values in our case we will set 4G
 Define the Control File Directory
 Define Data Files Directories
 Define Redolog and Size for them
 Create the DataBase and click Finish


Preparing the Solaris 11.3 OS for database installation
1.-Create Zpool and ZFS Files system
Create Zpool
#zpool create data c5t025340000233000865d0
Create ZFS Files System
#zfs create data/oracle-bin (For Install BINARIES)
#zfs create data/u01 (For Install DATABASE)
#zfs create data/arch (For REDOLOG)
#zfs create data/backup (and RMAN BACKUP)
The number one rule for setting up an Oracle database on ZFS is to set ZFS recordsize equal to the database block size for the file systems that contain the Oracle data files.
recordsize = db_block_size
2.-In this case we are installing a OLTP Database, we will set the File System Recordsize to 8k, as zfs recommend
#zfs set recordsize=8k data/oracle-bin
#zfs set recordsize=8k data/u01
#zfs set recordsize=8k data/arch
3.-Mount ZFS files system in the respective mount point
#zfs set mountpoint=/oraclebin data/oracle-bin
#zfs set mountpoint=/u01 data/u01
#zfs set mountpoint=/arch data/arch
#zfs set mountpoint=/backup data/backup
Now we have mounted the files system
4.-Create user and group for the database
#groupadd -g 1000 dba
#useradd -u 100 -g 1000 -m -d /oraclebin/oracle -s /bin/bash oracle
80 blocks
5.-Generate a project for the user oracle that will be used to manage the database
I have a previous template I will edit the /etc/project file and copy and paste the info below
#vi /etc/project
system:0::::
user.root:1::::
noproject:2::::
default:3::::
group.staff:10::::
group.oracle:200:Oracle Default:oracle::process.max-sem-nsems=(privileged,256,deny);project.max-sem-ids=(priv,100,deny);project.max-shm-ids=(privileged,256,deny);project.max-shm-memory=(privileged,1073741824,deny)
6.-Validate the project created
#projects -l
group.oracle
projid : 200
comment: "Oracle Default"
users : oracle
groups : (none)
attribs: process.max-sem-nsems=(privileged,256,deny)
project.max-sem-ids=(priv,100,deny)
project.max-shm-ids=(privileged,256,deny)
project.max-shm-memory=(privileged,1073741824,deny)
The project.max-shm-memory is the maximum quantity of memory that project can be use
7.-When you created the user in the step 4, the user oracle was created belonging to Default Project, now you need to change this and assign the user to group.oracle Project
$id -p
uid=100(oracle) gid=1000(dba) projid=3(Default)
Add the user to the "group.oracle" project as root you need to use the usermod command as below
# usermod -K project=group.oracle oracle
Login to oracle and with the id command you can check that you belong to the "group.oracle"
# su - oracle
Oracle Corporation SunOS 5.11 11.3 October 2015oracle@~$ id -p
uid=100(oracle) gid=1000(dba) projid=200(group.oracle)
8.-Set the correct permission for the files system created "oracle user" and "dba group"
#df -h | egrep "oraclebin|u01|arch|backup"
data/oracle-bin
488G 32K 394G 1% /oraclebin
data/u01 488G 31K 394G 1% /u01
data/arch 488G 31K 394G 1% /arch
data/backup 488G 31K 394G 1% /backup
data/oracle-bin/oracle
488G 35K 394G 1% /oraclebin/Oracle
# chown oracle:dba /oraclebin /u01 /arch /backup /oraclebin/Oracle
9.- Verify that you have installed the following packages, if you do not have them installed perform as root user the following command (You will need to have access to internet)
#pkg install top xterm xclock motif xauth x11-info-clients library/motif libxp make developer/assembler
Aditionally install the compatibility with ucb command (Berkley Software Distribution)
#pkg install compatibility/ucb
ORACLE BINARIES INSTALLATION
Oracle Database 11g Release 2 (11.2.0.1.0) for Solaris Operating System (SPARC) (64-bit)
10.-Upload to the server the installation packages and uncompress them (we uploaded them to /oraclebin)
solaris.sparc64_11gR2_database_1of2.zip
solaris.sparc64_11gR2_database_2of2.zip
#unzip solaris.sparc64_11gR2_database_1of2.zip
#unzip solaris.sparc64_11gR2_database_2of2.zip
11.-We will use the MOBATERM for installation process that help with Export Display
You can download it from the following page:
http://mobaxterm.mobatek.net/download.HTML
or you can export the display as below
#export DISPLAY=<REMOTEIPADDRESS>:10.0
12.-Go to oraclebin/database directory and execute "runInstaller" as Oracle
:/oraclebin/database$ ls -ltr
total 46
-rw-rw-rw- 1 oracle dba 5399 Nov 4 2009 welcome.html
-rwxr-xr-x 1 oracle dba 6513 Nov 6 2009 runInstaller
drwxr-xr-x 14 oracle dba 30 Nov 6 2009 stage
drwxr-xr-x 2 oracle dba 3 Nov 6 2009 sshsetup
drwxr-xr-x 2 oracle dba 2 Nov 6 2009 rpm
drwxr-xr-x 2 oracle dba 5 Nov 6 2009 response
drwxr-xr-x 4 oracle dba 14 Nov 6 2009 install
drwxrwxrwx 11 oracle dba 13 Nov 6 2009 doc
/oraclebin/database$ ./runInstaller
Starting Oracle Universal Installer...
Starting Oracle Universal Installer...
Checking Temp space: must be greater than 180 MB. Actual 37716 MB Passed
Checking swap space: must be greater than 150 MB. Actual 39903 MB Passed
Checking monitor: must be configured to display at least 256 colors. Actual 16777216 Passed
Preparing to launch Oracle Universal Installer from /tmp/OraInstall2016-06-03_10-12-08AM. Please wait ...


uncheck the checkbox "I wish to receive security updates via My Oracle Support".

Click Next


We will only install the Oracle binary, select the second option "Install database Software Only" then click NEXT


We did choose the Oracle Base and the Oracle Home as showed above and click Next

We Selected as Database Administrator and Operator the DBA Group, then click NEXT

Finally you can see the summary of the binaries installation, you can save a Response File if you want in order to have all the configuration for the binaries installation process. Click FINISH

At this point the installation is in progress ....

Ask to the SysAdmin run the following command as root user
# /oraclebin/oracle/product/11.2.0/dbhome_1/root.shRunning Oracle 11g root.sh script...
The following environment variables are set as:
ORACLE_OWNER= oracle
ORACLE_HOME= /oraclebin/oracle/product/11.2.0/dbhome_1
ORACLE_OWNER= oracle
ORACLE_HOME= /oraclebin/oracle/product/11.2.0/dbhome_1
Enter the full pathname of the local bin directory: [/usr/local/bin]:Database Configuration Assistant when a database is created
Finished running generic part of root.sh script.
Now product-specific root actions will be performed.
Finished product-specific root actions.
Finished running generic part of root.sh script.
Now product-specific root actions will be performed.
Finished product-specific root actions.

At this point we have finished the Oracle Binaries Installation
On other hand is recomendable to have the last SRU for the Solaris OS, in order to have updated the OS.
You can check the post Updating Solaris 11.X to 11.3 and SRU to 11.3.2.4.0
ORACLE DATABASE INSTALLATION
#cd $ORACLE_HOME
#./dbca


Set the DataBase Files Location in our case we will set /u01/data/oratest as the instance name

Specify the Flash Recovery Area and If you will have the DataBase in Archive Mode


We have done the OS configuration, Binaries and Database Installation.
LISTENER CONFIGURATION ORACLE 11G
Finally you will need to configure in the .profile in our case the environment variables.
Edit the .profile and add the lines with the correct information ( ORACLE HOME, ORACLE BASE, SID and PATH )
export ORACLE_HOME=/oraclebin/oracle/product/11.2.0/dbhome_1
export ORACLE_BASE=/oraclebin/oracle
export ORACLE_SID=ORATEST
export PATH=$ORACLE_HOME/bin:$PATH
export ORACLE_BASE=/oraclebin/oracle
export ORACLE_SID=ORATEST
export PATH=$ORACLE_HOME/bin:$PATH
Now Installing Listener, we will use the port 1530
As Oracle User
$cd $ORACLE_HOME/bin
$./netcat


$lsnrctl start LISTENER
$netstat -an | grep 1530 | grep LISTEN
*.1530 *.* 0 0 128000 0 LISTEN
*.1530 *.* 0 0 128000 0 LISTEN
Regards
Roger
Comments